How To Run Selftest Successfully When Selftest Fail Due To Unsuited Capacity
HDD ID: WDC WD2500AAKX-001CA0; Serial Number: WD-WMAYU08856953; Family: Tahoe_LT; Microcode: 00030010
The following hdd has selftest run but failed. To check the selftest history and find out what happened, users can go to view the IBI logs.
We can find one of the import selftest process failed-B9-format with plist, the time shows 00. This step is very important for selftest because it reassigns the data area defects to the p-list. If this step fails, there will be many bad sectors found during the scanning.
The user went to format with p-list and see what happens, finally it’s one straight line and failed.
The user went to check the plist and found there were 21685 defects which has exceeded the maximum defects allowed and this is the reason the selftest failed.
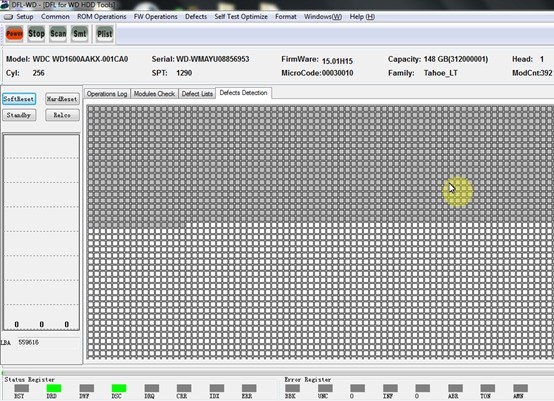
Next the users went to reduce the capacity from 250GB to 160GB to increase the maximum defects. Users go to edit the HDD ID under Common Menu of DFL-FRP for WD.
The user edited the LBA value from 476280000 to 312000000 and all of the LBA 1, LBA 2, LBA 3 and HPA value were all changed to the new smaller 312000000. Next the user went to edit the Model number from WD2500AAKX to WD1600AAKX. After the new changes, the user went to write the new changes to the hdd.
Power off and on the hard drives and the new changes became effective.
Next the user went to format with plist again.
Wait about 30 seconds after the successful format, the user stopped the format, clicked softreset and then went to scan the hard drive, the hard drive bad sectors have been repaired.