How To Extract Data Quickly After Completing The Selective File Image
File image is often used when the patient hard drive is not working stably or the drives have a lot of bad sectors or users have just performed head swap and the partitions and folders can be listed.
If you go to extract the files, the program may hang or it takes a long time for soft reset or hard reset or even power reset. At this time, you may use file image and it generates usually better result.
To use the function of file image, users need to click the file extraction icon and set up one new task.
Select to set up one new project, select the source disk and create the file extraction path with default setting, enter the file extraction interface, list the partitions by clicking the plus icon before the DFL-Device.
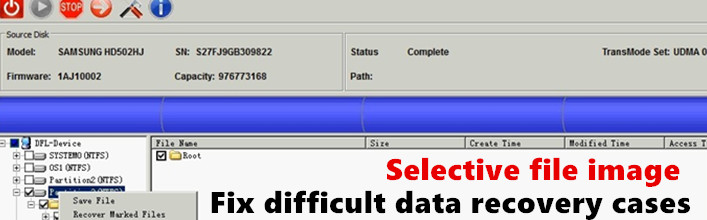
Select the wanted partitions and files and right click the selected ones and go to File Image>Mark Selected Files. Select the target drive and create the bitmap file. Next users can start the file image.
Next users right click the selected partition and select hex edit, copy the current LBA number.
Right click to the bitmap area and view target drive sectors, replace the target current LBA number with the copied LBA number of the selected partition and files from original hard drives.
Click to read the LBA and it’s the same content as we read from the same LBA in the original drives.
Go to window, click general menu, set up one new file extraction project on the target drive and enter the file extraction interface, right click the DFL-Device, scan lost partitions, input the copied LBA number from the original drives as starting LBA.
Start scan and the selected partition from the original drive was immediately found, save it and then the user can successfully list the partitions easily. So users can use this data recovery method to fix many difficult data recovery cases and Dolphin Data Lab will upgrade our DFL-DDP USB3.0 data recovery equipment with more new data recovery functions.


