Find Out Bad Heads And Cut The Bad Heads With DFL-WDII HDD Repair Tool
With DFL-WDII hdd repair tool, users can repair the bad sectors caused by bad heads, it’s easy to find out the damaged heads and cut the damaged heads so that the patient hdds can work again.
The following case study is to tell how to find out the bad heads and cut them.
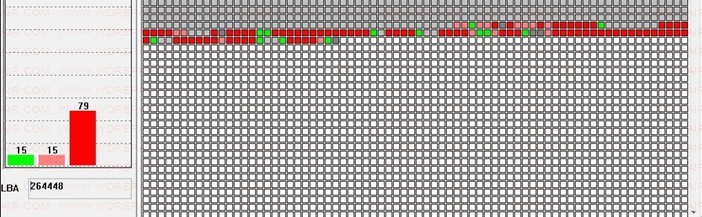
Scan the hdd and users can find the intensive bad sectors;
Write Down the LBA value of the bad sectors, the starting LBA and ending LBA of the bad sectors;
Go to Menu Common–>CHS LBA Translate;
Input the recorded LBA value of the bad sectors and convert it CHS values and here users can easily find out the bad head where the bad sectors are located. It’s head 1 in this case study;
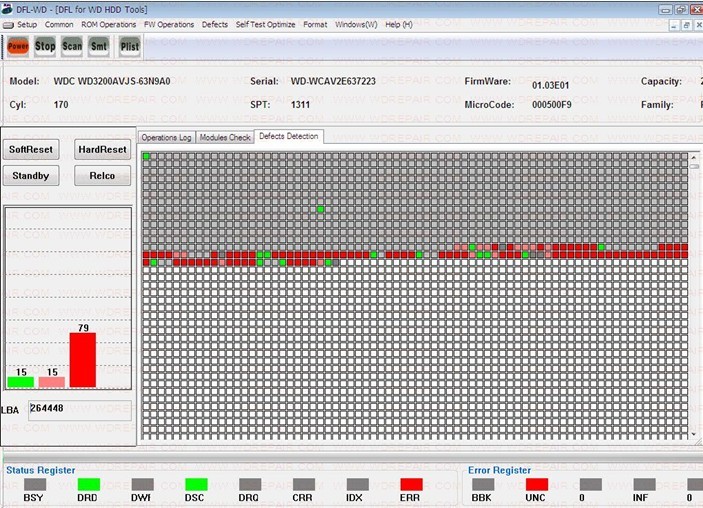
View G-list to check if there’re defects records in it and from the screenshot below: users can find there’re indeed bad sectors which display these bad sectors are located in head 1 too. So we confirm again the head 1 problem;
Next we can check the latter LBA range of this hdd and check if there’re bad sectors. Unfortunately there’re also bad sectors in the tested latter LBA range of the HDD. Like what we have done above, write down the LBA of these bad sectors and convert the LBA to CHS values. The same result was got and the bad sectors were located in the head 1 too;
Next users go to check Copy 1 in ABA mode for precise modules checking to see if the modules can be read. If the copy 1 cannot be read, it further confirms the head 1 problem;
By different tests on the patient hard drive, we can now really confirm it’s head 1 problem and users are ready to cut heads now;
Next is to clear G-list, Reset Smart, Clear Translator;
Next is to go to menu ‘Headmap Edit & Depop’ and configure to depop the head;
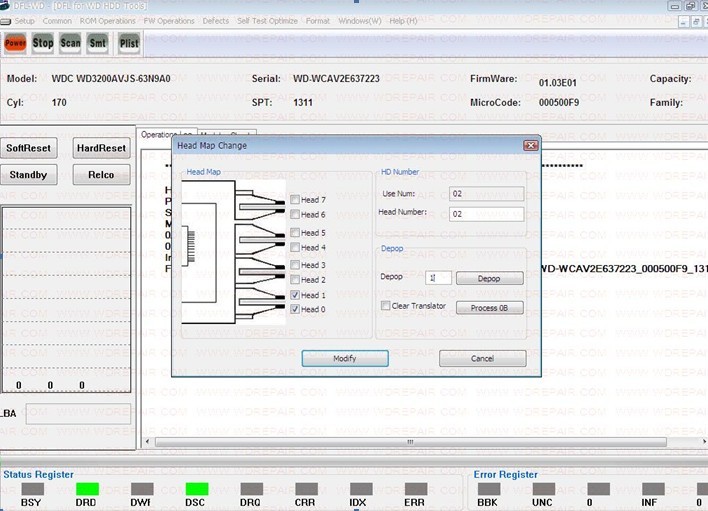
Next is to process 0B and Generate another copy by editing the OB automatically;
Next is to input the head number to depop, which is head 1 and then click Depop;
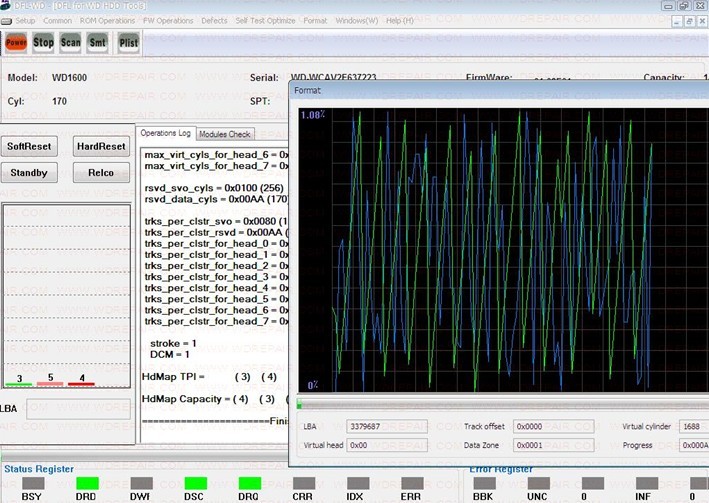
After the bad head is cut, the user was trying to format with plist. However, the user found the format cannot be started and display error. This is because the Capacity and TPI had been changed after cutting heads and we need to make them match;
View the factory Info, there’re still two heads this is because these info is from module oc and it cannot be changed automatically and need to set the cap and TPI manually to make them match.
Next the user went to the TPI and CAP configuration interface, input 1 to Decrease VKFCI so that the CAP and TPI can be automatically adjusted. After Decrease VKFCI, the TPI and CAP have changed and matched with the current max value the hdd allowed. Format With P-list again and the format starts normally and then this hdd can be repaired now.
For a higher success rate of hdd repair and data recovery, cheers!
January 18, 2013
By Dolphin Data Lab
http://www.hddtools.net
http://www.wdrepair.com
sales@dolphindatalab.com


