Posts

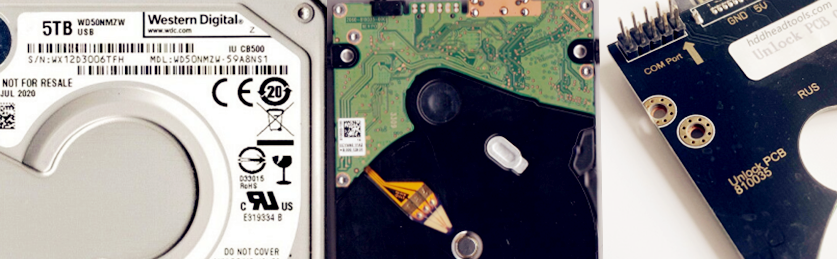
WD SMR 2060-810035 Spyglass II HDDs have both MCU lock and SED lock. To repair firmware corruption and recover lost data, users need to fix the MCU lock first: swap with special 2060-810035 firmware unlock PCB or writing unlock rom to bypass the MCU lock by DFL-WD hdd repair tool.

Please note: not all 810035 PCBs support MCU lock bypass by unlock ROM.

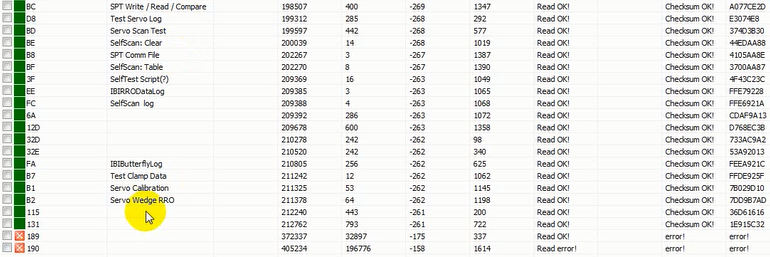
Most common HDD failures for WD SMR 2060-810035 Spyglass II HDDs:

The data area is not accessed;
The data area is full of 0000;
The drive is undetected due to 190 corruption;
Physical head damage.

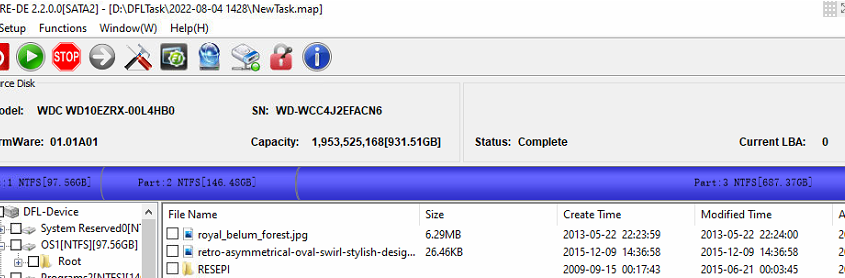
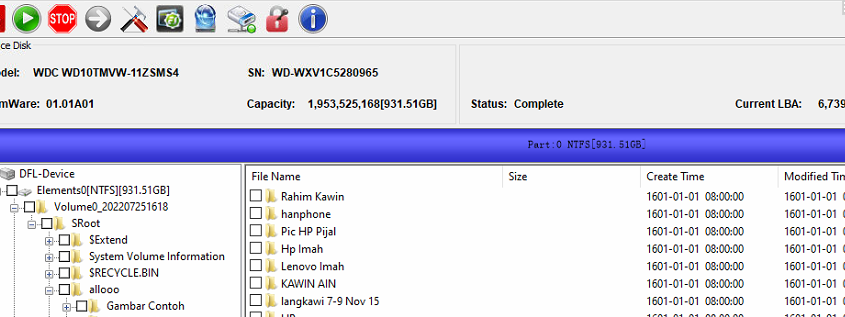
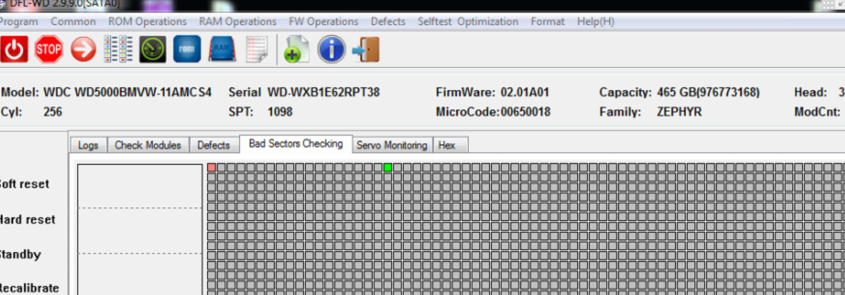
Most common functions and solutions used in repairing and recovering WD SMR hard drives:

Read/write ROM by HDD ROM Chip Pin Reader;
Generate unlock ROM by DFL WD hdd repair tool;
Sort nodes within module 190 by LBA/tree;
Scan missing nodes;
Delete overlapped nodes/wrong nodes;
Repair wrong nodes, etc.

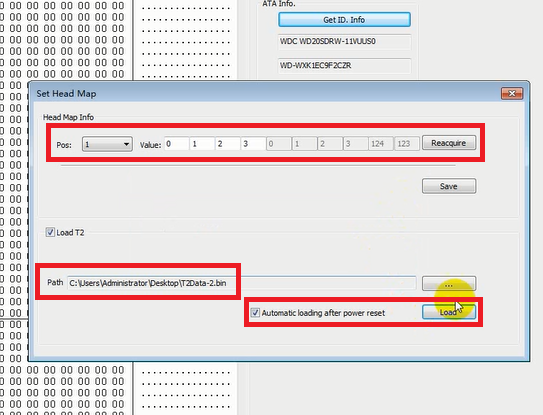
Users can save all the modification to one new module 190 and then users can write the new module 190 or load the module 190 or T2data to RAM by DFL-DDP data recovery equipment for immediate data recovery.

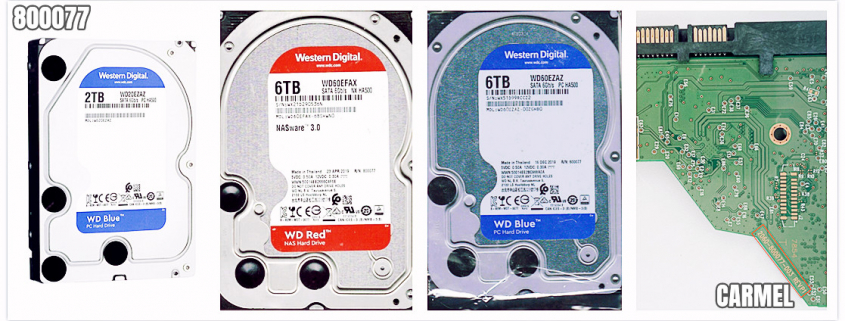
WD SMR 2060-810035 Spyglass II HDD Common PCB number and Models:

PCB number: 2060-810035-000 REV P0

WD40NDZW-11BCSS0 USB 3.0
WD40NDZW-11A8JS0
WD40NDZW-11A8JS1
WD40NMZW-59A8NS1
WD40NMZW-59BCBS1
WD50NDZW-11A8JS1
WD50NMZW-59BCBS0
WD50NMZW-11BCBS0
WD50NMZW-59A8NS1
WD50NDZW-11BCSS0

Any question is welcome to sales@dolphindatalab.com or add Dolphin Skype ID: dolphin.data.lab

Dolphin team has released new DFL-WD hdd repair software and new DFL-ST HDD repair software and users can download these new software from Dolphin user-only forum. With the new DFL-WD hdd repair software, users can further enhance the WD SMR HDD data recovery success rate.

With the new software, users can unlock more WD SMR HDDs by the original PCB without using special firmware unlock PCB, 800041, 800066, 800077, 800069, 810011, 810035, etc.

With the new software, users can fix more WD SMR hdd format cases, more all-sector-0000 cases, inaccessible data area cases, etc.

Users can download the latest WD hdd repair software from the forum.

More WD SMR HDD repair and recovery cases and tips below:

WD SMR HDD WD20EZAZ 810011 DATA RECOVERY CASE BY DFL USER IN SRI LANKA;
WD SMR 800077 CARMEL HDD REPAIR AND DATA RECOVERY STEPS
WD SMR 800065 800067 810003 CHARGER HDD REPAIR AND DATA RECOVERY SOLUTIONS
WD 800069 800066 SMR PALMER HDD REPAIR AND DATA RECOVERY SOLUTIONS
WD SMR SPYGLASS SPYGLASS2 800041 HDD REPAIR AND DATA RECOVERY STEPS

Any question is welcome to sales@dolphindatalab.com or add Dolphin Skype ID: dolphin.data.lab

This data recovery case study is shared by one of our experienced, smart, friendly and kind users from Sri Lanka, his name is Dananjaya who offers very professional data recovery services in Sri Lanka.

HDD ID Information:
Patient drive: WD20EZAZ
PCB: 2060-810011

Reported symptoms
According to the drive owner, when he was copying wedding pictures to HDD, windows OS popup error massage called “not enough space”

HDD Repair and Recovery steps:

1.Once our user received the HDD, he checked. He found that when power on HDD, it spin up, but then two times’ clicking and power down. Like platter damage;
2.He tried to unlock, but same scenario. No modules showed, only power up, two clicks, power down;
3.So he guess it can be module damaged. But couldn’t power up. He used only pcb and disable module 02, module 411 and kernel mode. But same clicking;
4.He found a donor PCB with same microcode HDD. Then used patient PCB to donor for test, donor drive can be detected as normal;
5.He put donor to PAITENT HDD. Luckily the patient drive can be detected. But after 10 seconds, gave one click and went to busy status. Not responding;
6.He managed to power on and off till enter the inside of FW program;
7.He disabled module 02. After doing that HDD shows module and no clicking. But once enabling module 02, start clicking again. He had to disable again to get all modules;
8.He edited module 02 manually and write it SA. Fortunately no clicking, smoothly worked with HEX 00;
9.DFL repaired the corrupted module 190, he then wrote it to SA and load to RAM. “missing node function ” and “repair nodes function” which built in version 2.31 were used for this case;
10. Two partitions are displayed properly, the image speed is quite good, up to 150M per second.

HDD Repair and Data Recovery Equipment used in this data recovery case study:

DFL WD HDD Repair Equipment
DFL-DDP Data Recovery Equipment

Welcome to send your questions or enquiry to sales@dolphindatalab.com or add Dolphin Skype ID: dolphin.data.lab for any consultation.

How to recover lost data from WD SMR 800077 Carmel patient hard drives?
2060-800077-003 HDD Family: CARMEL

WD CARMEL HDD Failure Types:

SED lock and MCU lock;
Weak heads
Slow issue by firmware corruption;
All sectors 0;
Inaccessible data area;

Common Functions to be used to repair and recover lost data from WD SMR Carmel HDDs

HDD ROM chip pin reader to read/write ROM content;
MCU unlock ROM generation;
Disable 411;
Sector response time modification;
T2Data backup;
SMRzone backup;
190 backup, repair(Scan missing nodes, repair wrong nodes, delete overlapped nodes, etc ), write, ram loading(T2 auto loading);
Head map set up;
etc

WD CARMEL HDD Models:

WD60EDAZ-11BMZB0 2060-800077-003 REV P1
WD60EMAZ-51TKPB0 2060-800077-003 REV P1
WD60EZAZ-00ZGHB0 2060-800077-003 REV P2
WD60EFAX-68SHWN0 2060-800077-003 REV P1

WD20EZAZ-00GGJB0 2060-800077-003 REV P1

To repair and recover lost data from WD SMR Carmel hard drives, users need to have the following hdd repair tool and data recovery equipment:

HDD ROM Chip Pin Reader
DFL-WD HDD Repair Tool
DFL-DDP Data Recovery Equipment

WD SMR Carmel HDD Repair and Data Recovery Steps:
DFL-URE AND HDD ROM CHIP PIN READER HELP WITH EASIER WD SMR HDD FIRMWARE UNLOCK

Helpful links:

WD 2060-800077 WD20EZAZ HDD Firmware Unlock PCB

Any question is welcome to sales@dolphindatalab.com or add Dolphin Skype ID: dolphin.data.lab

This is one successful Western Digital WD10EZRX-00L4HB0 hard drive data recovery case study for one DFL user in Indonesia.

Patient HDD ID:
PCB: 1945. Family: TRAILXLS. Microcode: 1005G

Patient HDD Failure Symptoms:
Undetected hdd
Spin up and Down

HDD repair tool and data recovery equipment used in this case study:

DFL-WD HDD Repair Tool
DFL-DDP data recovery equipment

HDD repair and Data Recovery Steps

1, Connect patient hdd to DFL hdd repair hardware;
2, Power on and enter DFL-WD hdd repair software by kernel mode;
3, Backup ROM and Disable 02;
4, Firmware restart and re-enter the program to backup firmware modules;
5, One click to fix slow issue;
6, One click to fix 36 issue;
7, Enable 02 and firmware restart;
8, Enter DFL-DDP data recovery program and users could enter the file extraction interface and all lost data had been recovered successfully.

Any question is welcome to sales@dolphindatalab.com or add Dolphin Skype ID: dolphin.data.lab

This is one successful hdd firmware repair and data recovery case study for one DFL user from Malaysia. This WD patient HDD had both firmware failure and file system error.

HDD ID:

Model number: WDC WD10TMVW-11ZSMS4
SN: WD-WXV1C5280965

HDD Failure Symptoms:

Not detected;
Folder empty;

HDD Repair and Data Recovery Equipment used in this case study:

DFL-WD HDD Repair Tool
DFL-DDP data recovery equipment

HDD Repair and Data Recovery Steps:

Enter DFL-WD HDD repair program by kernel mode;
Disable 02 and firmware restart;
One click to repair common slow issue and test other firmware modules;
Enable 02 and firmware restart;
Enter DFL-DDP data recovery equipment software and selected file extraction module;
Lost partitions and folders were listed but the folders were empty;
Right click the partition and click menu ‘Scan Files>Fast Scan’ and all the folders were listed and at this time, the folders were full of data;
The users selected all the wanted data and then started the file extraction and finally all the lost files were perfectly recovered.

Any question is welcome to sales@dolphindatalab.com or add Dolphin Skype ID: dolphin.data.lab

It is now possible for DFL users to unlock the WD SMR HDDs firmware area on the original PCB without special firmware unlock PCBs.

The new solution for WD SMR HDD firmware unlock is available within DFL-WD hdd repair tool and to use this solution, users need to have DFL HDD ROM chip pin reader(Many users have already had this one.) and the steps are as below:

1, Remove the original PCB from data drive;
2, Read the original ROM from original PCB by the HDD rom chip pin reader set without soldering rom chip off;
3, Generate firmware unlock ROM;
4, Write unlock rom to original PCB by the HDD rom chip pin reader set without soldering rom chip off;
5, Install the original PCB to data drive and users can see the firmware area is already unlocked successfully;
6, Users can use DFL-WD hdd repair tool to backup important firmware modules, specially the module 190, smrzone, T2data, etc;
7, Users can image the HDD or extract lost data directly if users have DFL-URE or DFL-UREP by using DFL latest T2 auto loading tech;
8, If the original PCB is physically damagaed but the Main chip and ROM chip are still good, users can use the special firmware unlock PCB and then move the original main chip to the firmware unlock SATA PCB and write original ROM to the firmware unlock PCB for disk imaging or file extraction;
9, In some cases, users need to repair the damaged firmware module 190 or repair the SMR HDD slow issue to continue for data recovery.

The WD SMR HDD firmware repair and data recovery solution is more and more complete and successful and DFL users will be able to fix more and more new data recovery cases.

Please note: the new solution supports 800066, 67, 69, 77, 11, etc but doesn’t support 810033 and 810035 which have quite different rom structure and algorithms. For WD 810033 and 810035, users still need to get the special firmware unlock PCBs for firmware unlock.

Any question is welcome to sales@dolphindatalab.com or add Dolphin Skype ID: dolphin.data.lab

This is one patient WD SMR Charger HDD from one DFL user in China who has other data recovery tools but failed to get the lost data back due to the 190 loading issue.

HDD ID:

WD20SDRW-11VUUS0
Family: Charger
4 Heads
Microcode: 6008J
SPT: 1860

This DFL user contacted Dolphin team and bought DFL PCIe data recovery express recharge version and DFL-URE Plus and applied for remote support.

By DFL PCIe data recovery express, the user had safely backup the rom and firmware modules and tested the firmware modules and found the modules 189 and 190 are corrupted with checksum errors. At this time, the engineer had to backup the 190 by ATA but still some sectors failed to be read in module 190. The engineer repaired the module 190 by DFL-WD 190 repair solution and got new 190 and at the same time, the T2 data was extracted as one important part of 190.

By DFL-URE Plus, the engineer could connect the Charger USB HDD directly, before loading T2Data, all sectors were found as 0, next the engineer selected the menu ‘Edit Head Map in RAM and Load T2’ and the engineer loaded the T2 data automatically.

After T2 auto loading after power reset, the engineer went to check data area again and the hex data becomes normal.

Next the engineer went to file extraction and the lost partition, folders and files were perfectly listed and finally all lost data was recovered.

Watch the video here on How to use DFL URE UREP to Recover Lost Data Easily from WD SMR HDDs Suffering All Sectors Zero:

Any question is welcome to sales@dolphindatalab.com or add Dolphin Skype ID: dolphin.data.lab

Here is one more successful data recovery case study for one DFL user in Italy.

HDD ID:

Model number-WD20EURX-64HYZY0
PCB: 1945
Family: DIABLO3S
SPT: 1740
4 Heads

HDD Failure Symptoms:

Wrong SN number: WDC-ROM SN#XYZ—
Capacity: 0

HDD repair tools and data recovery tools used in this case study:

DFL-WD hdd repair tool
DFL-DDP data recovery tool

HDD repair and data recovery steps are as below:

1, Connect the patient HDD to DFL-SRP data recovery hardware;
2, Open DFL-WD hdd repair software by the DFL Control Panel;
3, Enter program, get module list, backup ROM and important firmware modules;
4, Test firmware modules;
5, Common repair>Slow Fix;
6, Power off and on but the failure was not fixed;
7, Hex>LBA read>sector 0 and sector 0 was normal and ok but capacity was still 0 and the recovery was not possible;
8, This step is available in Dolphin user-only forum here;
9, Power off and on, check the data area and the data area was fully accessed;
10, Open DFL-DDP data recovery tool, set up one new data recovery project and all lost folders and files were listed and finally all lost data was recovered perfectly.

Any question is welcome to sales@dolphindatalab.com or add Dolphin Skype ID: dolphin.data.lab

This is one PCB damaged and firmware corrupted WD5000BMVW-11AMCS4 patient hard drive and its PCB number is 771820.

This patient PCB is for one DFL user from Italy. When the user got this patient HDD, the original PCB was damaged, the ROM chip was burnt and the HDD didn’t spin up at all.

To fix this patient hdd and get the lost data back, users need to have DFL-WD hdd repair tool and DFL DDP data recovery tool and the data recovery steps are as below:

1, For these non-spinning drives, the very first step is to get the patient drives spinning again by getting one donor PCB with the same PCB number;
2, Enter DFL-WD hdd repair tool, get the module list and check the microcode from module 11 or other overlay modules;
3, This step is available in Dolphin user-only forum;
4, Enter DFL-WD hdd repair tool again(if users cannot enter program successfully, users can try to short connect tv9 and tv10), test all firmware modules and found out module 02 was corrupted, the HDD was still not detected;
5, This step is available in Dolphin user-only forum;
6, Power off and on and the patient HDD was detected perfectly;
7, Enter DFL-DDP data recovery tool, all lost data was recovered successfully.

Any question is welcome to sales@dolphindatalab.com or add Dolphin Skype ID: dolphin.data.lab