Posts

F3 T>^l
RECOV Servo Op=0095 Resp=0005

SIM FileFD=FC37D103 ErrorCode=43160080 DiscLBA=0000000000009D9C Duration=000006C3 ms
RECOV Servo Op=0195 Resp=0005
RECOV Servo Op=0095 Resp=0005

SIM FileFD=FC37E104 ErrorCode=43160080 DiscLBA=0000000000009DCC Duration=000005FF ms
RECOV Servo Op=0195 Resp=0005
RECOV Servo Op=0095 Resp=0005

SIM FileFD=FC37B101 ErrorCode=43160080 DiscLBA=0000000000009D3A Duration=000007C8 ms
RECOV Servo Op=0195 Resp=0005
M11 CheopsLiteA SATA 2.0 RAP30.8.2 SMR 2MB Flash 150 zn zoneds
Product FamilyId: 72, MemberId: 01
HDA SN: WCK0MT1K, RPM: 5527, Wedges: 178, Heads: 8, OrigHeads: A, ActiveHdMap: 00FF, Lbas: 00003ADABD42, PreampType: 84 30
Bits/Symbol: C, Symbols/UserSector: CB6, Symbols/SystemSector: CB5
PCBA SN: 0000E735FUZK, Controller: CHEOPSLITE_1_0_SATA(1410), Channel: Unknown, PowerAsic: Unknown Rev 00, BufferBytes: 8000000
SF ID: EF 60, SF Part Size: 800, Flash Used: 800
Package Version: M1A1804D6.SDMA.MD0004., Package P/N: ———, Package Global ID: 00480560,
Package Build Date: 12/27/2016, Package Build Time: 23:14:40, Package CFW Version: M1A1804D6.SDMA.MD0004.01174104.00480560.,
Package SFW1 Version: D604, Package SFW2 Version: —-, Package SFW3 Version: —-, Package SFW4 Version: —-
Controller FW Rev: 12272314, CustomerRel: 0001, Changelist: 01174104, ProdType: M1A1804.SDMAQC, Date: 12/27/2016, Time: 231440, UserId: 00480560
Servo FW Rev: D604
TCG IV Version: 30.05
Package BPN: 8
RAP FW Implementation Key: 1E, Format Rev: 0206, Contents Rev: 2B 03 13 00
Active BFW Container: 1
4K Sys Area: 1
Features:
– IOEDC enabled
– IOECC enabled
– DERP enabled v. 6.0.00.0000000000000001
– LTTC-UDR2 disabled
– SuperParity 4.1 enabled
– Humidity Sensor disabled
– Media Cache Partition enabled
– Media Cache enabled
– Low Current Spin Up Normal
– Ready Sequence Optimization disabled
– Torn Write Protection enabled
– Zone Remap disabled
– AGB enabled
– SubRelease:0
– Critical Event Log v. 1
– FAFH 40.11 disabled
– EWP:0
– DRAM Mirror:0^z
ASCII Diag mode

F3 T>i4,1,22

RECOV Servo Op=01A5 Resp=0005
F3 T>^z
ASCII Diag mode

F3 T>V4
Reassigned Sectors List Enabled
Entries: 0000, Alts: 0000, Removed: 0000,
Pending: 0000, Host Pending: 0000, Max RSL Size: 00008400 Idx LBA PBA LLLCHS of LBA Wdg PLPCHS of PBA SFI Hours Msecs Status BBM Mask

F3 T>m0,6,3,,,,,22

RECOV Servo Op=0095 Resp=0005

SIM FileFD=FC375035 ErrorCode=43160080 DiscLBA=000000000000B511 Duration=00000693 ms
RECOV Servo Op=0195 Resp=0005

SIM FileFD=FC375035 ErrorCode=43160080 DiscLBA=0000000000022A3C Duration=00000953 ms
RECOV Servo Op=0095 Resp=0005

SIM FileFD=FC36D01D ErrorCode=43160080 DiscLBA=000000000000A424 Duration=000006E4 ms
RECOV Servo Op=0195 Resp=0005

SIM FileFD=FC36D01D ErrorCode=43160080 DiscLBA=000000000002194F Duration=00000964 ms
DiagError 0000500EProcess Defect List Error
R/W Sense 00000002, R/W Error 041C0087, List Offset 00000000, List Index FFFFFFE8, File Error 00000000

F3 T>^a
Prod Desc: M11 CheopsLiteA SATA 2.0 RAP30.8.2 SMR 2MB Flash 150 zn zonedservo 5400RPM
Package Version: M1A1804D6.SDMA.MD0004.
Serial #: WCK0MT1K
Changelist: 01174104
Model #: ST4000LM024-2AN17V
ID: 101
Servo FW Rev: D604
Heads: 8
PCBA SN: 0000E735FUZK
Default factory config: SD&D
Active config: SD&D

TotalHostWrites 00000000

NumberOfSegWrites 0000

TotalHPCBROs 00000000

TotalBWOs 00000000

MCMTWrites 00000000

Idle1Count 0000

MCSegmentUsed 0000

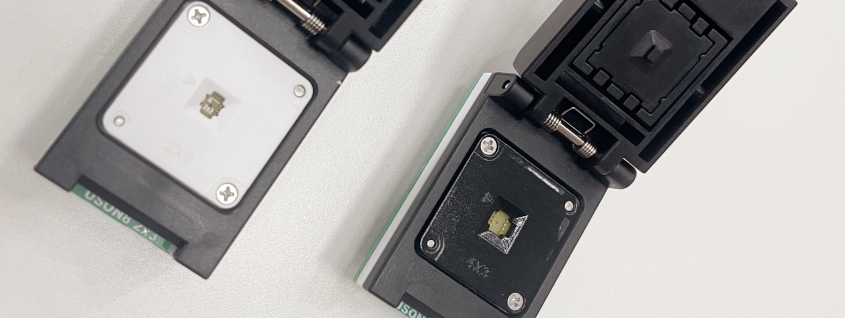
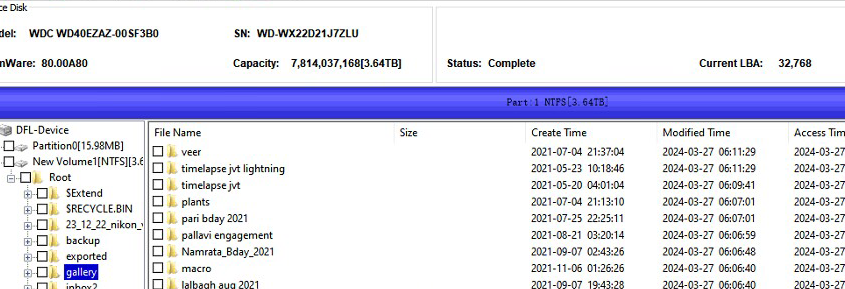
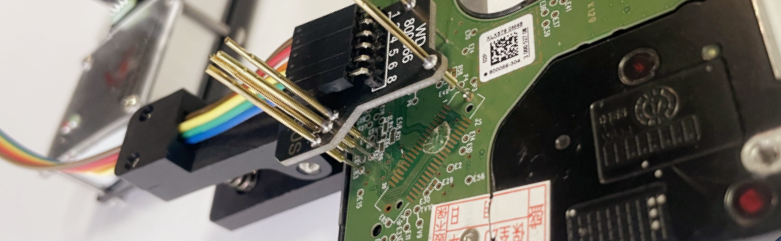
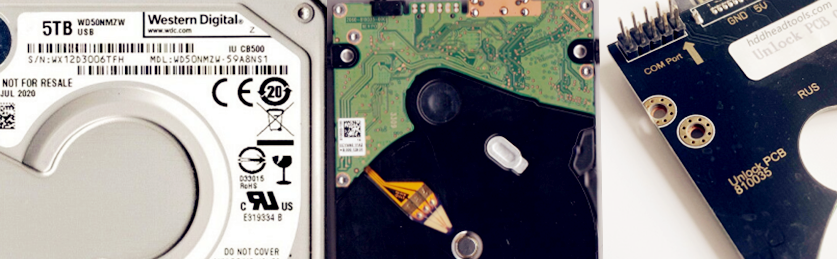
For above patient ST4000LM024 HDD data recovery, users need to open the patient HDD in clean room, find donor heads and swap the heads with proper hdd head replacement tools to continue.

This is one very successful Western Digital SMR hard drive firmware repair and data recovery case study for one Dolphin user in India.

WD SMR Patient hdd id:

Model number-WD40EZAZ-00SF3B0
PCB number: 810011

WD SMR Patient hdd Failure symptoms:

Spin up and down and not possible to access data area

Firmware repair tools and data recovery tools used in this case study:

DFL-SRP for WD firmware repair tool
DFL-DDP data recovery equipment

WD SMR Patient hdd firmware repair and data recovery steps:

01: Backup up original WD SMR Patient hdd ROM by ROM chip pin reader;
02: Generate unlock rom by DFL-SRP for WD firmware repair tool;
03: Write unlock ROM to original 810011 PCB;
04: Connect PCB only, enter DFL-WD firmware repair software by kernel mode and then disable 411;
05: Install the PCB to patient HDD and backup key firmware modules, specially module 190;
06: Repair module 190(unique 190 repair assistant);
07: Fix SMR slow issue;
08: Auto load 190 to ram within DFL-DDP data recovery tool disk image setting;
09: Access to data area and all lost partitions and folders were available for immediate easy data recovery.

Any question is welcome to sales@dolphindatalab.com or add Dolphin Skype ID: dolphin.data.lab

This is one 8TB WD82PURX-78GVLY0 DaHua DVR hard drive and the user couldn’t access this DVR drive in their DVR device and all videos were lost.

To recover all the lost valuable videos from this Western Digital helium DVR hard drives, the user selected Dolphin DVR data recovery software to recover the lost videos.

The user mount the DVR drive by DFL-SRP data recovery hardware to PC and the Dolphin DVR data recovery software detected the DVR drive and listed it, the user extended all the lost 4 partitions and recovered all the lost videos. Please note the user needs to select the partition one by one to recover.

Video Guide: WD82PURX 78GVLY0 DaHua DVR HDD Data Recovery Steps

Any question is welcome to sales@dolphindatalab.com or add Dolphin Skype ID: dolphin.data.lab

WD10JMVW-11AJGS2 is one Western Digital SED laptop hard drive. It’s very common to deal with the firmware corrupted cases of these WD SED HDDs.

For this patient WD SED HDD, the firmware area couldn’t be accessed directly, the rom couldn’t be read either. The patient HDD was detected wrongly and running slowly.

To fix the firmware issue, the engineer short connected tv9 and tv10, read rom, disable 02, slow fix, firmware restart and the patient hdd was detected properly by DFL-WD hdd repair tool.

After the firmware repair, the user opened the DFL-DDP data recovery software but the result was bad because no partitions were detected, no folders, no files.

The user viewed the source drive sector 0 and didn’t find any partition mark of 55 AA and other hex data was not normal at encrypted status. The user tried using the auto decryption function but the software asked for inputing the software and finally failed.

The user went back to DFL-WD firmware repair software, went to FW Operations>Module Editing>Edit HDD ID>Security Subsystem, ticked the SED and firmware restart, went to DFL-DDP, the lost partition, folders and files were all available for immediate data recovery.

Video instruction of How to Recover WD10JMVW Encrypted Hard Drives

Any question is welcome to sales@dolphindatalab.com or add Dolphin skype id: dolphin.data.lab

Users have different options to read and write ROM from Seagate and Western Digital hard drives.

For many hdds, users can use firmware repair tools to read and write ROM directly.

For some new hdds, firmware repair tools don’t support to read or write ROM due to SED lock, MCU lock or other PCB issue or ROM chip issue. At this situation, users can only use flash programmer to read and write rom from the ROM chips.

For traditional flash programmers, users need to solder the ROM chips off and put the ROM chip to the chip holder to read and write rom.

Not all engineers have good soldering skills and Dolphin team offered Chip-on HDD Flash Programmer Smart, users just need to remove the PCB and then users can use the pin reader to read and write rom without soldering the rom chips off.

Now users don’t need to remove PCB, don’t need to solder the ROM chips off, users just need to install the HDD ROM programming clip adapter to the HDD and then users can use Chip-on HDD Flash Programmer Smart and its software to read and write ROM easily.

Users can read details of HDD ROM programming clip adapters here.

Any question is welcome to sales@dolphindatalab.com or add Dolphin Skype ID: dolphin.data.lab

This is one Seagate ST4000VX013 hard drive firmware repair and data recovery case study for one Dolphin user in India.

Patient HDD ID:
Model number: ST4000VX013-2XG104
Family: B2
Capacity: 4TB

ST4000VX013 Patient HDD Failure Symptoms:
Clicking noises; Spin up and down; partitions lost

ST4000VX013 Required HDD Repair Tools and Data Recovery Equipment
DFL-Seagate hdd repair tool
DFL-DDP data recovery equipment

ST4000VX013 HDD Repair and Data Recovery Steps
01: Backup head adaptive module;
02: Swap heads and write donor adaptive data by DFL-Seagate hdd repair tool;
03: Backup sys35 NGlist;
04: Clear g-list and regenerate translator;
05:  Repair data offset;
06: Disable vacant active;
07: Reverse scan to get all lost partitions by DFL-DDP data recovery equipment.

Any question is welcome to sales@dolphindatalab.com or add Dolphin Skype ID: dolphin.data.lab

This case study teaches how to recover lost data from one undetected Western Digital WD10EZEX hard drive.

Patient HDD ID:
Model number-WD10EZEX-00RKKA0
Family: Tressels
Head number: 2
PCB: 2060-771824

Patient HDD symptoms:
Undetected

Western Digital hdd firmware repair and data recovery steps:

1, Connect patient hdd to DFL-WD hdd firmware repair tool;
2, Power on patient hdd, the patient hdd was not detected, load loaders automatically by selecting the donor firmware path with the same microcode;
3, Refresh Id or re-enter the program without power off the hdd, the patient hdd was still not detected;
4, Test the firmware modules and found module 11 and 12 were damaged;
5, Found donor firmware module 11 and 12 of the same microcode and wrote the modules to patient HDD;
6, Power off and on and refresh the HDD ID, the patient HDD was repaired successfully;
7, Connect patient HDD to DFL-DDP data recovery hardware and all lost data was recovered.

Any question is welcome to sales@dolphindatalab.com or add Dolphin Skype ID: dolphin.data.lab

Case study name: WD20JDRW-11C7VS0 810082 USB undetected hdd firmware repair and data recovery steps

Patient HDD ID

Model number-WD20JDRW-11C7VS0
Capacity: 2TB
PCB: 2060-810082

Failure symptoms:

Undetected, spin up and down, data area was not accessed

HDD Firmware repair tools and data recovery tools required:

DFL-WD HDD firmware repair tool
DFL-DDP data recovery equipment

HDD firmware repair and data recovery steps:

01: Convert the USB PCB to SATA interface;
02: Backup the original rom and disable 411;
03: Backup important firmware modules, specially module 190;
04: Use the latest DFL-DDP to repair the module 190 to get one new T2data file;
05:  …
06: After above step, the patient hdd was detected properly and the spin up and down issue was fixed as well;
07: Enter DFL-DDP data recovery software and set up one new disk image project;
08: Set T2data auto loading to RAM;
09; Refresh data area and the data area was accessible.

Full case study is available within the Dolphin user-only forum here

Any question is welcome to sales@dolphindatalab.com or add Dolphin Skype ID: dolphin.data.lab

After Dolphin Data Lab released the latest G3 WD SMR HDD USB to SATA data recovery adapter and its software, it becomes easier and easier for Dolphin users to recover lost data from WD SMR USB hard drives.

Helpful videos to learn more about the G3 WD SMR USB HDD adapters and its software:

Video 01: How to Install G3 WD USB to SATA Data Recovery Adapter 
Video 02: How to Image Extract Lost Data From WD USB HDDS Faster and More Stably
Video 03: Latest data recovery assistant software for WD SMR USB HDDs

To recover lost data more easily from WD SMR USB hdds, users can try the following steps:

01: Connect G3 adapter to WD SMR USB hdds by USB type c cable;
02: Click connect device and Read ROM directly by G3 adapter software;
03: Generate unlock rom by DFL-WD hdd firmware repair software;
04: Click ‘Block 411 Write’ , select the generated unlock rom and write rom by G3 adapter software;
05: Close ROM operations by G3 adapter software and go to DFL-WD hdd repair software;
06: Lock UA writing, backup important firmware modules, specially module 190;
07: Test firmware modules and repair;
08: Open DFL-DDP data recovery software for disk image or file extraction, load 190 to ram auto if there’s all sectors 0000 issue.

Any question is welcome to sales@dolphindatalab.com or add Dolphin Skype ID: dolphin.data.lab

When users receive Toshiba hard drive data recovery cases of head failure, users need to diagnose the hdd head failure properly and use correct data recovery solutions.

Toshiba hdd failure symptoms:

Clicking noises;
Busy;
Working slowly;
Undetected/wrongly detected.

HDD Repair tools and data recovery tools required to fix Toshiba patient drives with head failure:

DFL-Toshiba HDD firmware repair tool
DFL-DDP data recovery equipment

Data Recovery Solutions required to fix Toshiba patient drives with head failure:

01: Toshiba HDD Heads read/write test;

02: Edit head map within SA area;
03: Set auto virtual translator within disk image settings for unstable Toshiba patient hard drives;
04: Set up head map for imaging good heads first and then image weak heads;
05: Swap heads by Toshiba hdd head replacement tools within clean room.

Any question is welcome to sales@dolphindatalab.com or add Dolphin Skype ID: dolphin.data.lab